Pages

Friday, October 31, 2008

So Thankful For You

Edited to add.. This card is now available as a Class Kit, please click here for more information.

I fell in love with the "Harvest Expressions" clear stamp set from Inkadinkado the minute I saw it. I think it is so beautiful!! So far I have made three cards using this stamp set, all of them for my upcoming "Be Thankful" card class at Cranberry Hill Mercantile. Just in time for Thanksgiving.

Today I will show you one of the cards. This card measures 5 1/4" x 5 1/4".


I used Cuttlebug Maple Leaf cut and emboss combo. With the embossing folder I embossed leafs four times, one in each corner. I sponged red ink over the leafs to make them stand out more. From yellow cardstock, I cut out the leaf and stamped in brown ink inside of it. The tree and the greeting are the one single stamp. I then sponged the leaf with orange, red and a little bit of brown ink.

Brown square and green scalloped square were cut and embossed with Nestabilites. The leaf is attached to the brown square. This layer is popped up with dimensionals.

I am very happy with the way this card has turned out (if I can say so myself ;-) ).

This class is scheduled for:

Tuesday, November 11th, 11 am to 2:30 pm
Wednesday, November 12th, 11 am to 2:30 pm

To sign up for the class, please call Cranberry Hill Mercantile at 408-736-9151.


:) Irina

Wednesday, October 29, 2008

One show is over, one more to go..

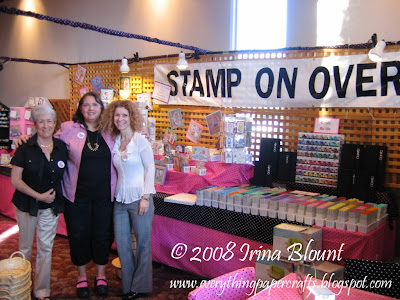
Finally I got some pictures and some time to tell you about our experience at the Stamp in the Hand show last Saturday in San Jose, CA. It was so much FUN!! We set our booth on Friday night and on Saturday morning we were ready for the customers. We were busy all day long!!

Our booth looked so pretty and we got so many compliments from the customers. We were told that our booth was the best one and the busiest one!! We had so many different things for sale at the booth: over 150 Magnolia (Tilda, Edwin and accessories) stamps, Copic Markers, Dew Drops, Silk and Paper Flowers, Cuttlebug Folders, Nestabilites, Scor-Pal, just to name a few..

I did not have an empty chair for my make-and-take at any time during the show and most of the time people were in line. I didn't even have a minute to look around at other vendors and no time to shop, but that might be a good thing ;-) .

I also did a quick Copic Markers presentation during the show.

And here are some photos:

Monique, Geri (owner of Stamp On Over at Cranberry Hill Mercantile) and me

Nicole, Geri and me

Here I am at the Make-and-Take table. Behind me are the class sample boards.

Copic Markers Display. See how many colors we had!!

Magnolia stamps display, we tried to have either a sample card or at least a colored image for every stamp!! Last minute touches before the show opened and the crowd arrived :-) .

This is me giving a Copic Markers presentation.


Here are a few photos of the Make-and-Take table


Sorry for such a long post, but I also want to tell you that we are going to another stamp show and taking Tilda on the road!! It is again a Stamp in the Hand show, but this time it is in Carson, CA. We will be there on Saturday, November 8th and Sunday, November 9th!! For more information about the show, please click here.

I would love to meet all Tilda fans from Southern California. Please leave me a comment here and let me know if you are coming to the show, and please stop by our booth to say hi.

Hope to see you there!!

:) Irina

Tuesday, October 28, 2008

Holiday Cheer Cat

Edited to add.. This card is now available as a Class Kit, please click here for more information.

Isn't this cat just too adorable?! This is the second card for my "Penny Black Cats Christmas" card class at Cranberry Hill Mercantile. To see the other card please scroll down to the post below or click here.

This card measures 5 1/4" x 5 1/4".


The cat was stamped with Memento ink, colored with Copic Markers and then cut out. There is white Fun Flock and Stickles on the hat, Diamond Glaze on the holly leaves and the rhinestones for the berries.

I used both sides of the printed paper on this card. The paper is by Scenic Route Paper Company.

The greeting is from the clear stamp set by Hero Arts. I just love this set, it has so many different holiday greetings in different fonts and sizes.

This class is scheduled for next Thursday, November 6th. There will be two classes, the morning one is from 11 am to 2:30 pm and then in the evening from 5 pm to 8 pm. To sign up for the class please call Cranberry Hill Mercantile at 408-736-9151.

:) Irina

Monday, October 27, 2008

I am "back to work"!!

Edited to add.. This card is now available as a Class Kit, please click here for more information.

I am "back to work" making cards for the classes now when the stamp show is over. I will talk more about the show and will post some photos in a few days. Now, onto the card..

This is one of the cards for my upcoming card class at Cranberry Hill Mercantile. I will show you the other card tomorrow. The card measures 4 1/2" x 6.


Once again I made my "shadow box" style card. Watch Winter Scor-Pal E-zine for my tutorial for this type of card.. The opening in the card was cut and embossed with Nestabilites.

This cutest cat is the stamp from Penny Black. The image was stamped with Memento ink and colored with Copic Markers. Stickles on the branches and Diamond Glaze on the ornaments. I stamped the holly in red all over the red layer and then the same holly inside of the card. Red Dew Drops in the corners.

Greeting is from the clear stamp set by Hero Arts.

This class is scheduled for next Thursday, November 6th. There will be two classes, the morning one is from 11 am to 2:30 pm and then in the evening from 5 pm to 8 pm. To sign up for the class please call Cranberry Hill Mercantile at 408-736-9151.

:) Irina

Friday, October 24, 2008

And we have a WINNER!!

When I made a post for the blog candy on Monday October 20th, my blog was rated at 345. As of today it is at 324!! Thank you all for finding time in your busy lives to stop by my blog and a special thank you to those of you who leave me comments. Please know that it is very appreciated and makes me so happy to know that there are people out there that like my work. That means so much to me!!

I used http://www.random.org/ to generate the winning number. I had 85 entries to my blog candy, and the winning number this time is 24.

Sandy D., you are the winner!!! Below is Sandy's comment:

"Congrats on your Blog making it into the top 300-350. I couldn't choose just one class- LOL! If I lived in your area there are two of your classes that I would have a front row seat in; Score-Pal & Cuttlebug Cards & Cuttlebug & Nestabilities Christmas.
Thanks,
Sandy D.
sdul at insightbb dot com"

Congratulations Sandy!! Please email me your mailing address and also your choice for the stamped Tilda/ Edwin images.

Thanks again to everyone who entered into the blog candy. I will have another one next month or so.

:) Irina

Halloween Blog Candy

This post will remain on the top of my blog until this Friday, October 24th. For more recent posts, please scroll down..

What is the better time for the candy then Halloween? Even if it's not real candy, but a Blog Candy instead.. I would actually go for these goodies over candy any time ;-)..

Another reason for the Blog Candy is to celebrate a new milestone for my blog. Now it is rated at #345, that means that my blog has moved into a higher ranking and is now showing in the 301-350 bracket on Stamping Top 50 website. (I know it doesn't show 345 on my blog yet, but it does on their website and should be updated on my blog within a few days..) Updated 10/21 - Oh, look, it is already at 337!!!

This is what I have for the Blog Candy this time:


Oh, sorry.. Cat is not included ;-)

But here what is included: Stampin' Up Simply Scrappin Kit - Just Delightful (with cardstock, printed paper and tons of cardstock stickers), Halloween and Christmas stickers, tons of Prima Flowers, some ribbon, Raining Tilda stamp (used by me only once). Plus I will stamp for you 20 Tilda and/or Edwin images of your choice. Cranberry Hill Mercantile sponsored the package of the pink Paper Frills and the clear stamp set by Stampendous with so many different greeting !!

And here is what you need to do to enter:

- We are going to play a little Treasure Hunt this time.. Please visit the Cranberry Hill Mercantile's blog, here is the website http://stamponover.blogspot.com/ . Check out my classes there, whenever it says "with Irina" in the title, those are my classes. Then leave a comment on my blog under this post and let me know which one of my classes you would take if you lived in the area.

- If you are one of my students and already take my classes, please leave a comment under this post and let me know what type of class/es you would like to see in the future.

- To receive a second entry into the blog candy, please mention my Blog Candy on your blog and leave a second/separate comment under this post.

If you don't live in US, not a problem. I will ship internationally!!

I will pick the winner at around 8 pm PST on Friday, October 24th.

Good luck to all!!

Hugs,

:) Irina

Thursday, October 23, 2008

We are going to the Show!! - Tilda Tag

The Stamp in the Hand show also known as The Original Rubber Stamp Convention is this Saturday, and we've been so busy getting ready for it. Cranberry Hill Mercantile will represent Magnolia (Tilda, Edwin and accessories) stamps. We have more then 150 different designs in stock!!! We are also bringing other things along with Magnolia stamps such as Copic Markers, Copic Refills and Copic Storage, Dew Drops, Nestabilites, Zig Gold Painty and White Gel Pens, Silk Flowers, Stamp Pads, Stickles and MORE!!

I will be doing a make-and-take with this Christmas Tag with Tilda. Doesn't it look like she is waiting for Santa? You will get to stamp Tilda and color her with Copic Markers, and will go home with the completed Gift Tag.

I had to make this tag pretty big to accommodate the image, it measures 4" x 6". I think it can even be used as a card or as a Christmas ornament.


If you are planning on attending the show, there are some tickets that are still available for purchase at Cranberry Hill Mercantile for $5.00. Or you can buy your ticket at the show for $6.00.

For more information please visit A stamp in The Hand website, click here.

See you there!!

If you haven't entered into my Blog Candy yet, check it out on the post above or click here. Tomorrow is the last day to enter!!

:) Irina

Wednesday, October 22, 2008

Pink Box

This month's theme for my Stamp Club was "Pink" in honor of the Breast Cancer Awareness Month. This is what I came up with, I made an altered card box.


I used various silk flowers that can be found at any craft store, various "vintage" buttons and the tile letters on the front of the box. Inside (unfortunately I did not take a photo of it) there is a tag adhered to the lid that reads: "an empty box and a clean house are the signs of a lazy crafter" ;-).

Don't forget about my Blog Candy, only a few days left to enter!! Details on the post above or click here.

:) Irina

Tuesday, October 21, 2008

What's Up with Tilda?

I know summer is over, but I have hard time letting it go. I just had to make another summer card. Besides, I love, love, love this little Ms. Sheep!! Isn't she just adorable?! Well, not as much as Tilda of course, but still...

This card measures 6" x 6".


I stamped the Swing on the white paper, colored and then sponged the clouds all over the layer. Do you want to know how I make my cloud template? I just punch out the oval using the Pink Scallop Oval punch by Marvy, that's it. Easy!!

Tilda was stamped colored with Copic Markers and then cut out. The dress and the scarf are paper pieced with the back side of one of the red double sided printed papers. I put pop up dots under her feet and under her head, but her body is glued on to the card. It looks more realistic to me that way.

Little Ms. Sheep was colored with Copic Markers and also cut out. There are stickles all over her little body. I put pop up dots under her head and the body, but her feet are glued on to the bottom of the card.

Do you like what I did inside of the card? The sentiment is from Memory Box..


All images are from Magnolia. Printed Paper is by Scenic Route. Paper flowers from Imagenisce.

All supplies used to create this card are available at Cranberry Hill Mercantile. If you do not live in the area, please give store a call at 408-736-9151 to make your purchase and it will be shipped to you.

Don't forget to enter into my blog candy, details are in the post above or click here.

:) Irina

Sunday, October 19, 2008

Scor-Pal and Cuttlebug Cards

Here are the cards two and three for my "Scor-Pal and Cuttlebug" card class at Cranberry Hill Mercantile. To see the first card please scroll down to the post below or click here.

Again I had the issues with taking clear photos of these cards, please click on the pictures to enlarge them if you would like to see the details.

Both of these cards measure 3 3/4" x 9" and will fit in the regular US Mail envelope.

On the first card I used two different Cuttlebug folders, "the birds and swirls" and "the music notes". I first embossed white layer on the top with the birds and swirls, then embossed one music line on the bottom. With the Scor-Pal I scored a horizontal line under the music notes and then six lines between two different designs. Tied the ribbon and placed the greeting over it. The greeting stamp is from Stampendous stamp set called Everyday Messages 2.

On this card I used the diamond pattern Cuttlebug embossing folder. I had to turn it horizontally and ran the cardstock through Cuttlebug two times to cover the top of the layer with the design. Then I scored three lines at 1/4" each on the bottom of the white layer. I also used my Scor-Pal to make the frames on the white squares. The butterflies are the Cuttlebug die-cut and emboss combo.

This class is scheduled for:

Tuesday, November 4th, 11 am to 2:30 pm
Sunday, November 16th, 11:30 am to 3 pm

To sign up for the class, please call Cranberry Hill Mercantile at 408-736-9151.

:) Irina
Saturday, October 18, 2008

Scor-Pal and Cuttlebug Card #1

Edited to add.. Don't forget about the Anniversary sale at Cranberry Hill Mercantile, details are on the bottom of the post I made yesterday, to view please click here.

I was asked by a few of my students to come up with the cards for the class using Cuttlebug and Scor-Pal. I actually had a very productive day today ;-) and got to make not just one but three cards!!

I had hard time taking photos of the cards tonight though. I guess even with the spotlight lamps there is not enough light at this time of the night.. I can only show you this card right now, and will have to take the photos of the other two again tomorrow morning when the sun is up with the better lighting.

This card measures 5 1/4" x 5 1/4".

I used white and metallic bronze cardstock for this card. On the white layer I first scored three lines with Scor-Pal on the right side, and then ran the left side of the layer through the Cuttlebug with Scrip embossing folder. The maple leaf was heat embossed with Copper Embossing powder (this stamp is from Inkadinkado).

I love how elegant this card looks and how easy it was to make it.

As I mentioned, this is one of three cards for my "Scor-Pal and Cuttlebug" card class at Cranberry Hill Mercantile. This class is scheduled for:

Tuesday, November 4th, 11 am to 2:30 pm
Sunday, November 16th, 11:30 am to 3 pm

To sign up for the class, please call Cranberry Hill Mercantile at 408-736-9151.


:) Irina

Thursday, October 16, 2008

One Layer Tilda Card

Well, it is not really a one layer card, more like three layers if you count the card itself, blue cardstock and the white layer. BUT... The main layer with Tilda on it does not have any raised parts, and Tilda herself is not even cut out!! I had challenged myself to make a simple "one layer" card with Tilda, and I am very happy with the way it came out. This Tilda image is just too cute!!

This card measures 4 1/4" x 5 1/2".


On this card I used two masking techniques, masking and reverse masking. I stamped Tilda twice, once on the card layer and one more time on the scrap piece of paper. Cut out the one stamped on the scrap and covered my "main" Tilda. I created the oval mask with Nestabilites, and placed it over the card layer. I stamped the Tree with Snowflakes (this stamp is also from Magnolia) in blue ink. Then sponged light blue ink inside of the scallop.

Tilda was colored with Copic Markers. I added Stickles to the white parts of her outfit and also on the tree and the snowflakes.

The greeting is from Hero Arts clear stamp set.

This will be one of the cards for my "One Layer Tilda cards" class at Cranberry Hill Mercantile. This class is scheduled for:

Thursday, November 20th, 11 am to 2:30 pm
Thursday, November 20th, 5 pm to 8 pm

To sign up for the class please call Cranberry Hill Mercantile at 408-736-9151.

------------------------------------------

On another note, I have an announcement to make! Cranberry Hill Mercantile is having it's annual Anniversary Sale until this Sunday. EVERYTHING in the store is at 10% OFF!!! That includes Tilda stamps, can you believe it?! If you don't live in the area, please give store a call at 408-736-9151 to make your purchase and it will be shipped to you!! Oh, and there are prize drawings everyday with the Grand Prize being 10 (ten!!) Copic Markers!!!!

Cranberry Hill Mercantile business hours are 10 am to 6 pm PST.

:) Irina

Tuesday, October 14, 2008

Bobblehead Birthday Elephant

This card was so much fun to make. It is not really in "my" colors, but I like how it turned out. Bright and Fun!!

This card measures 6" x 6".


The Elephant was stamped twice on white cardstock and colored with Copic Markers. I then used Nestabilites and cut out the circle shape with the Elephant in the center. From the second stamped image I cut out his head only and attached it to the main layer with a spring. I made my spring by curling the thin wire around the pencil. And I got myself a bobblehead Elephant!!!

For the balloon I punched out the circle, colored it with Orange Copic Marker and then heat embossed with a layer of UTEE.

The elephant stamp is by Whipper Snapper, the greeting on the balloon is by Penny Black and the presents inside are from Magnolia (Tilda).

This will be one of the cards for my "Happy Birthday" card class at Cranberry Hill Mercantile . This class is scheduled for

Thursday, October 23rd, 11 am to 2:30 pm
Thursday, October 23rd, 5 pm to 8 pm

To sign up for the class please call Cranberry Hill Mercantile at 408-736-9151.

:) Irina

Monday, October 13, 2008

Seasons Greetings Poinsettia

Oh, I just LOVE how this card has turned out, if I can say so myself ;-) . This is the second card for my "Cuttlebug and Nestabilites Christmas" card class at Cranberry Hill Mercantile. To see the other card please click here.

This card measures 4 1/2" x 6" and will fit in the A6 size envelope.


I used this beautiful Poinsettia stamp from Penny black and inked it with red and green inks directly to the rubber. I then heat embossed the greeting (from Hero Arts) in gold. With my Cuttlebug and Oval Nestabilites, I embossed around the image. Then used the same Nestabilites die as the template and sponged yellow ink outside and inside of the oval. The corner is a Cuttlebug Die Cut.

Dew Drops for the berries and Stickles on the flower. DONE!!

This class is scheduled for:

Thursday, October 30th, 11 am to 2:30 pm
Thursday, October 30th, 5 pm to 8 pm

To sign up for the class, please call Cranberry Hill Mercantile at 408-736-9151.

Sunday, October 12, 2008

Christmas Reindeer

I love making Christmas cards, they are definitely my favorite. I made this card for my upcoming "Cuttlebug and Nestabilites Christmas" card class at Cranberry Hill Mercantile. I will show you the other card for the class tomorrow.

This card measures 5 1/4" x 5 1/4".


Both circles (plain and scalloped) were cut and embossed with Nestabilites. The reindeer were heat embossed with the Detailed Gold embossing powder, the stamp is by Penny Black (LOVE IT!!). I stamped little snowflakes from Lizzie Ann Designs and put Stickles in the centers of the snowflakes. I am not sure if you can see it on the photos, but I also used the same snowflakes to stamp on the red layer with red ink. I used the Circle Nestabilites die as a template and sponged some yellow ink inside of the circle with Reindeer. I just love how something simple like that makes such a huge difference and make the image pop.

The corners on the card were made by cutting the embossed scalloped circle in four parts. There are green Dew Drops in the center of the corners. I made similar corners on one of my "purses" here and really loved what Claudia has done with the corners on this card.

The greeting inside of the card is from the clear stamp set by Hero Arts. The greeting was punched out with Blue Oval Marvy Punch and layered on the scallop that was punched with Pink Scallop Oval Marvy punch from Gold Cardstock. I sponged yellow ink on the sides of the white layer.

With my Zig Painty I added dots on all of the scallops, on the front of the card as well as on the inside scalloped oval.

This class is scheduled for:

Thursday, October 30th, 11 am to 2:30 pm
Thursday, October 30th, 5 pm to 8 pm

To sign up for the class, please call Cranberry Hill Mercantile at 408-736-9151.


:) Irina

Saturday, October 11, 2008

Halloween Edwin - inspired by Carole

My friend Carole made this fun Halloween card and emailed me a photo of it. Carole used Whipper Snapper stamps and Cuttlebug Embossing folder. What a great card Carole!! I love it!!

In fact I loved it so much that I had to make one of my own with this Haunted House embossing folder and the new Edwin stamp from Magnolia's Fall and Halloween collection. Thank you for inspiration Carole!!

This card measures 4 1/4" x 5 1/2".


I embossed Haunted House on the light purple cardstock and then sponged purple ink on the top of it to have more definition to the shape of the house. I then sponged "clouds" around the house with more purple ink. Sponged some yellow ink around the moon. Orange Stickles in the windows (Carole's idea).

Edwin and the Bats (the bats are also from Magnolia) were colored with Copic Markers and then cut out. There are Crystal Effects on Edwin's cape, shoes and on the bats. Inside of the card, I stamped the candy bag (also from Magnolia's new collection), sponged the moon behind the bag and sponged some purple on the sides of white cardstock. "Happy Halloween" stamp is by Imagenisce.

This will be one of the cards for my Hallowen Tilda and Edwin Card class at Cranberry Hill Mercantile. To see other cards please click here and here.

This class is scheduled for Wednesday, October 22nd, 11 am to 2:30 pm. To sign up for the class, please call Cranberry Hill Mercantile at 408-736-9151.


:) Irina

Friday, October 10, 2008

Calling all Groupies ;-)

I added a new feature to my blog, it is called "Follow This Blog". It is located on the right side of the page right below "email me". Here is some information about the new feature from the Blogger website:

"What is Following?
Do you have a favorite blog and want to let the author and readers know that you are a fan? Well now you can do that and more with the Blogger Following feature! You can even keep track of the blogs you follow via your Reading List on the Blogger dashboard."

Please note, you don't have to have a blog, but need to have a blogger account in order to become a follower.

Please let me know if you have any questions or need help using the "Follow This Blog" feature.

:) Irina

Claudia's Sketch - my Tilda Card

Edited to add.. This card is now available as a Class Kit, please click here for more information.

I was visiting Claudia's blog today as I do every single morning, she made this gorgeous card with one of the new stamps from Magnolia's Fall release and has also posted a sketch. I already knew which stamps I was going to use to make a card today and already picked the papers, and thought that Claudia's design would be perfect for my card. I had to rotate the sketch a little bit to fit my card better. Love, love, love how this one has turned out!!!

This card measures 6" x 6".


I combined stamps from different Magnolia collections on this card. The Luggage stamp is from the newer Travel collection, and Flower Jeans Tilda and Rufus are from the older ones.

I stamped suitcases on brown Bazzill cardstock with orange peel texture because it has kind of like leathery look to me. I then colored it with Copic Markers and added some detail with Gold Zig Painty. I also used Gold Zig Painty to add "stitching" to the ribbon.

Tilda was colored with Copic Markers and then cut out. Her blouse and the cuffs on the jeans are paper pieced with the background paper.

Rufus was colored with Copic Markers, cut out and placed inside of the card.

Printed paper is from Cosmo Cricket. The greeting is by Hero Arts.

All the supplies used on this card ( stamps, Copic markers and the paper) are available at Cranberry Hill Mercantile. Cranberry Hill Mercantile is not an online store, but you can place your order over the phone at 408-736-9151 and it will be shipped right to your door.

:) Irina

Thursday, October 9, 2008

Tilda For You

Edited to add.. This card is now available as a Class Kit, please click here for more information.

If you ask me which one is my favorite stamp from the new Fall and Halloween release from Magnolia, this Tilda is the one!! She is just too cute.

This card measures 6" x 6".

I had hard time photographing this card because of the reflection on the paper. I don't know how many photos I took (aren't digital cameras great?). Here are the best of the shots...


I really love how this card has turned out. This printed paper from THE PAPER COMPANY is just so pretty, it has shimmer all over it plus the embossed leafs are already on the paper!! Love it!! I created scallops on the bottom of the layer with Fiskars border punch. I used the same punch to create the scallops on the paper with stripes for the inside of the card. Paper with the stripes is also from THE Paper Company.

Tilda was colored with Copic Markers and then cut out. Look at her scarf, it was paper pieced with the background paper.

I added "stitching" to the brown ribbon that Tilda is standing on with my Gold Zig Painty.

The greeting inside of the card was stamped on the printed paper with brown ink and then punched out with Marvy blue oval punch. The greeting is by Hero Arts.

This is the card number three for my upcoming card class at Cranberry Hill Mercantile. Click here to see the card number one and here for the card number two.

This class is scheduled for Tuesday, October 28th, 11 am to 2:30 pm. To sign up for the class, please call Cranberry Hill Mercantile at 408-736-9151.

If you would like to purchase stamps from the new Fall and Halloween collection (or any other Magnolia, Sarah Kay, Rachelle Anne Miller and more) and do not live close to Sunnyvale, CA, please give Cranberry Hill Mercantile a call at 408-736-9151. You can make your purchase over the phone and the stamps will be shipped to you.

:) Irina

Wednesday, October 8, 2008

Fall Tilda - Thanks Very Much

I am so in love with the new collection from Magnolia. This release has so many cute images and is definitely one of my favorite collections!!

This card measures 6" x 6".


I just love brown and blue color combination. The blue decorative paper is from KI Memories and the brown paper with the gold dots is from the Paper Company (this paper has a look and feel of a handmade paper, gorgeous!!).

There was a lot of cutting on this card, and I am not very good with the exacto knife due to weakness in my wrists. I love how the card turned out though, all that cutting was totally worth it!!

The Oak tree is also from Magnolia, from one of the older collections. This is the first time I used the whole tree on the card. I colored the leafs in orange, yellow and green colors to make them look like fall. Really pleased with how the tree turned out. Tilda's jacket and the hat were paper pieced with the blue background paper. Cute, cute, cute!!

Greeting is from the clear stamp set by Hero Arts, I seem to use this set a lot. The plain and the scallop ovals for the greeting were cut out with Marvy Punches. Gold Zig Painty in the scallops of the brown circle.

To attach the ribbon to the card, I used 1/8" Scor-Tape, it works great!! I love it!! There is a light blue Dew Drop at the end of the ribbon.

Inside of the card I stamped the part of the same tree. All images were colored with Copic markers.

All stamps and the paper used on this card are available at Cranberry Hill Mercantile . If you do not live in the area, please give store a call at 408-736-9151 to make your purchase and it will be shipped to you.

This is the card number two for my upcoming Fall Tilda card class at Cranberry Hill Mercantile . This class is scheduled for Tuesday, October 28th, 11 am to 2:30 pm. To sign up for the class, please call Cranberry Hill Mercantile at 408-736-9151.

:) Irina

Tuesday, October 7, 2008

Whipper Snapper Snowmen

I guess this is what happens when you teach classes.. One day you make Halloween cards and the next day jump right into Christmas :-).

I love, love, love these cute snowmen from Whipper Snapper. Don't they just make you smile?


Both cards measure 5 1/4" x 5 1/4".

First card is pretty simple, but I really like the layout. Used Snowflake Cuttlebug Embossing folder on the white layer. Snowman (or is he a snowball?) was colored with Copic Markers, added some Stickles and Gold Brads for the buttons. The greeting is from the clear stamp set by Hero Arts.


Second card is the Shaker Box style. The white layer was embossed with Cuttlebug Snowflake embossing folder. The opening in the red layer and the blue scallop around it were cut with Nestabilites. There are light blue glass microbeads inside of the shaker box, fun!! Snowman was colored with Copic markers and I stamped little snowflakes from Magnolia around him. I also stamped the same snowflakes on the white layer inside of the card. The greeting inside of the card is from the clear stamp set by Hero Arts.


I will be teaching a class with these cards at Cranberry Hill Mercantile. The class is scheduled for:

Sunday, October 19th, 11:30 am to 2:30 pm
Tuesday, October 21st, 11 am to 2 pm

To sign up for the class, please call Cranberry Hill Mercantile at 408-736-9151.

:) Irina